
PDF-chapter on Color Grading in Premiere Pro

Finally, the first complete chapter from The Cool Stuff in Premiere Pro is ready for download! Using the techniques explained on these 69 pages on Color Grading in Premiere Pro will bring your film to a new level of awesome!
Download the PDF file below and learn everything about Primary and Secondary Color Correction, Shot Matching, Creating Looks, Using the scopes, Color Correction Workflow, Memory Colors, Masks, Vignettes, Qualifiers, using Presets, dealing with LOG material, grading ARRIRAW, CinemaDNG and REDRAW, Sky fixes, and much, much more!
Update July 2017: This chapter is no longer available
The updated version of The Cool Stuff in Premiere Pro will be available this September, and the single chapters from the 2015 version are no longer available. See the web page for the updated book here.

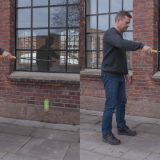
Before and after Primary Color Correction
Primary and secondary color correction explained
Learn how to properly adjust the color balance, contrast and levels and how to use masks and qualifiers to separately tweak specific areas or colors in the image. You’ll learn how to use the scopes to take the guesswork out of your color grading and how to grade different types of material, including DSLR recordings, footage shot on RED, Arri and the BlackMagic Digital Cinema Camera.

Secondary color correction
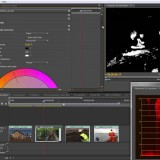
Create your own Looks and presets
Looks creation in Premiere is dealt with in great detail, with four methods for achieving the oh-so-popular Bleach Bypass and Teal & Orange looks. Cross process looks, Black & White, Blooming Whites, Sepia and Color Negative are also explained – and you’ll even learn how to make more commonly used presets like Cooling and Warming Filters and Highlight Roll-Off.

Cross Process
Download the chapter now! Only NOK 50.00 (about US $9.00)
You’ll be sent an e-mail with a personal download link.
This chapter is now obsolete. The chapter has been updated to cover more features added to Premiere Pro since this was released, and is now part of the book. Read more about The Cool Stuff in Premiere Pro here.
Sorry, this chapter is no longer available
The updated version of The Cool Stuff in Premiere Pro will be available this September, and the single chapters from the 2015 version are no longer available. See the web page for the updated book here.
This chapter was downloaded 559 times before it was EOL.
Table of content
If your film isn’t graded, it isn’t finished
It’s not black magic
You can use the monitor you have
Color correction, grading or look design?
Why color grade in Premiere?
Dedicated grading software forces a convoluted workflow
Is this chapter for you?
How much can you push it?
8-bit or 10-bit?
Karl’s “clicks on a knob” analogy
LIN, LOG and RAW formats explained
Why we get clipped highlights and crushed and noisy blacks
How cameras interpret image data
Linear image capture
LOG image capture to the rescue
LOG is basically a gamma curve
What about LUTs?
Tweaking the camera settings
Standard gamma settings
Cine-like gamma settings
LOG space if possible
Recording format
Expose to the right
Working with LOG material
Working with ARRIRAW material
REDCODE RAW Workflow
32 bit magic
It’s a matter of accuracy
Please don’t transcode (Box-out?)
See the 32-bit magic in action
Clipped and crushed levels
YUV?
GPU accelerated color precision explained
Multi-generation production workflows
Using the scopes
The Reference Monitor
Scopes in real-time
Scopes don’t lie, do they?
YC Waveform Scope for Noobs
Vector Scope for Noobs
RGB Parade Scope for Noobs
Cropping for accurate measurement
Title for accurate measurement
Using the Histogram
Miss the Y′CBCR Parade scope in this walkthrough?
Accurate vs. pleasing
Color correction workflow overview
1: Decide what’s important in the frame
2: Make primary corrections
3: Make secondary corrections (optional)
4: Create a look (optional)
This order is not accidental!
Adjustment Layers as Grading Tracks
Know when to stop
Workflow for primary color correction
Setting Black and White Levels
Setting midtone contrast
Lift, gamma, gain
Avoid Brightness & Contrast (Boxout)
Curves – my grading tool of choice
Why I like Curves so much
The S-curve
Don’t take my word for it
The versatile Three-way Color Corrector
How much is enough?
Keyframed color correction (boxout)
Memory colors
Skin tone
Sky
Sunsets
Foliage and grass
Perceived color and contrast
Secondary Color Correction
Qualifiers
CTRL samples 5×5 (boxout)
Blur your matte
Masks and shapes
Moving mattes and manual tracking
Center your masks box-out
Track it in AE
Workaround for variable feathering
Vignettes
Vignette using Circle
Vignettes with style
A highly flexible vignette approach
Combine Qualifiers and shapes
Shot matching
Multiple monitor panel set-up
Procedure for matching shots
Step 1: Set your workspace
Step 2: Find a hero shot
Step 3: Adjust the clips using scopes and your eyes
Step 4: Play the whole piece
Walkthrough of a simple shot matching job
Miscellaneous tips on shot matching
Crop it
Are more fixes needed?
Reuse the grades
Balance, then stylize
Find all instances of a clip in the timeline
Fixing problematic video
Flat and dull images
Underexposed footage
Overexposed footage
Colored clipping
Pushing skin tones
Add some blue sky
Get back the blue sky
Relighting an image
Changing autumn to summer
Don’t fake it too much
Achieving a “look”
Sepia
Bleach Bypass
Method 1
Method 2
Method 3
Method 4
Method 5
Teal & Orange
Method 1
Method 2
Method 3
Method 4
Presets – your secret weapon
More useful presets you may need
Black & White
S-curves
Roll-Off
Color Negative
Cross processing
Warming and Cooling filters
Warm and Cool Highlights
Blooming highlights
Blooming Blacks
Crushed blacks
Blue, blurred highs
Day for night
Additional tips on color grading
Kuler is your friend
Use textures to add lighting effects
Don’t make color grading your only tool


First of all let me say that i admire how you write and explain your techniques in a very clear and concise manner. I have collected dozens of books and tutorials about the subject of filmmaking and editing and nobody could explain it any clearer than you. More power and looking forward to the finished book. As a premiere pro and hdslr user, i also am looking forward to more books/training material from you about different aspects of filmmaking 🙂
HOW CAN I GET A COPY OF THIS BOOK ON COLOUR GRADING SIR I NEED IT
N.R., this isn’t a book on Color Grading – it’s a book on advanced techniques in Premiere Pro. There is only one chapter in the book that deals with Color Grading, but it’s 69 pages long. You buy it by clicking the Buy Now button above.
Please send me the the book color grading in premier i really need i t
Hi rufino, there is no book with that name, but the book “The Cool Stuff in Premiere Pro” has a huge chapter on Color Grading. You can order it here: https://premierepro.net/coolstuff/
Please send me the the book color grading in premier i really need i t
This chapter is no longer available, and it’s part of the book The Cool Stuff in Premiere Pro. I’ve also written an article for Frame.io about color grading in Premiere Pro. You can read The Complete Guide to Premiere Pro Color Correction on their blog.