
To transcode – or not to transcode?

There are a lot of misconceptions about transcoding, and discussions on transcoding show up in forums and groups quite often. In an attempt to bring some facts and practical advice on the table, I did a test.
The Myth I’m busting: Transcoding your 8-bit source material to 10-bit will magically make it more robust, so you can do heavy color grading in Premiere with better results.
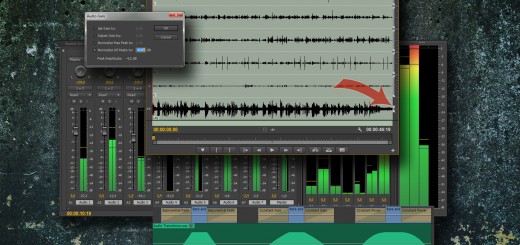
I added some heavy contrast adjustment in RGB Curves to an 8-bit H.264 DSLR footage (from a Canon EOS 7D camera). I also added the same adjustment to a 10-bit DNxHD (DNX HQX) transcoded copy of the file. Here are the results.
Result of transcoding test
I also tried Cineform 10-bit and ProRes 422 HQ. They all show the same problem. The 10-bit copy has more banding and blocking than the original.
Conclusion: You should not transcode to 10-bit to get better results after color grading
I was asked to be a guest blogger on ProVideo Coalition, and you can read the whole article, learn why it’s a bad idea to transcode, and watch more video examples on their site.


super)))
I think for a lot of people, the appeal to transcoding DSLR footage to DNxHD or ProRes is that it’s less taxing for computers to work with uncompressed material in the timeline. Not an issue for most systems, but if you’re on something with lower specs it could make a big difference.
Didn’t realize there were that many people out there who were convinced you’re getting the extra bit depth this way 😛
…strange conclusion… in Photoshop it is much MUCH better to transform a Jpeg in 16bits before treating the image, rather than staying in its native 8bit. We experiment that very often.
I thought the same would apply in Adobe Premiere.
The question would be more…how does does Premiere really internally treats the clip…
A good test would be to replicate your test with the same footage in a Photoshop timeline…I doubt you arrive to the same conclusion…at least it would underline Premiere’s weakness.
If by “transform a Jpeg in 16bits before treating the image” you mean that in Photoshop you go to Image > Mode > 16 Bits/Channel – that is not changing the image itself, it’s changing the working space in Photoshop from 8 to 16 bits per channel. So changes to the 8-bit image will be calculated in 16 bits per channel to lessen the rounding errors that cause banding etc. In Premiere, you don’t have to do this, because it’s already being calculated in 32 bits per channels by default. 32 is more than 16. Rounding errors are practically non-existent. Doing the same test in Photoshop (meaning Image > Mode > 32 Bits/Channel), yields the same result as in Premiere – not surprisingly.
Premiere has no weaknesses when it comes to color correction algorithms. It uses 32 bits per channel, which is the gold standard. It’s also the highest accuracy you can get in Photoshop, DaVinci Resolve and Final Cut X. The tools may lack some sophistication, but the math is done perfectly right.