
Syncing Dual System Audio in Premiere Pro

Dual System Sound Syncing
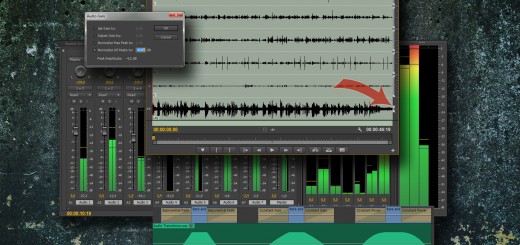
Learn how the Multi-Camera feature in Premiere works much better for syncing dual system sound than the old Merge Clips feature. Separately recorded audio can be automatically synced to your video using Audio, Time Code, In/Out points or Markers. Merge Clips requires you to know what clips belong together, it’s slow, it messes with the way my favorite shortcuts Q and W work, and it makes linking back to the original files a bit of a mess.
Using Multi-Camera auto-syncing instead, I don’t need to know what clips belong together, it’s much faster, I can still use Q and W as I normally do, and I can get the original files back with a right-click. Automatic, fast and easy. Watch the video tutorial and learn about the huge advantages of the Multi-Cam approach over the Merge Clips feature.
Want to learn more advanced editing techniques in Premiere?
The upcoming book The Cool Stuff in Premiere Pro will be the most comprehensive book on Premiere Pro ever, featuring a lot of previously unknown info on Premiere. This book dives much deeper into the software than all previous books on editing in Premiere, and when you master these techniques you will be editing a lot faster with less hassle and more confidence, and you’ll get better results.
The release is now very close! The book is written, and the layout done! The last chapter needs proofreading, and I will add a cover and a table of content and then stitch the chapters together in InDesign.


Nice tip thanks for sharing.
No need for Plural Eyes ever.
Nice – came across your tip just in time. Thanks 🙂
Great tip. Any idea why this would happen? – after I multicam everything, when I put the multicams into a work sequence everything is panned left. My source audio is 5 mono tracks and the multicam sequences come out as “multichannel mapped to 5 mono.”
That’s a new behavior in the latest versions of Premiere. Multi-channel tracks are panned left by default – they used to be panned to center. The workaround is to create a shortcut for “Set Clip Pan to Center” (I’ve used Shift+Ctrl+C, since I don’t use the Titler shortcuts too much). Select all the clips that you want to be panned to the center and hit Shift+Ctrl+C, and all the clips are panned center.
If you want to flatten the clips, you’ll need to do this again for the flattened clips.
Ah, brilliant. That’s the function I’ve been missing in my life. Thanks for the speedy reply (and for the book, which has helped me tremendously).
I also realized that if you make a brand new sequence and drag the multicam seqs into it (instead of dragging them onto the “new item” icon like I had been) then they’re centered in that new sequence. Odd behavior.
Yeah, that can be a bit confusing. The reason is that the Multi-Camera Source Sequence has Multi-Channel output, not mono or stereo. When we create a new sequence based on that, the new tracks are Multi-Channel tracks, which are panned left. If you create a new sequence first, you will most likely use Mono tracks or Standard tracks, and the panning will be centered by default.
thanks a lot,brilliant tutorial.
i was stuck with plural eyes 4
this liberated me and made double system editing a breeze
This almost does something I really need: sync audio to video using timecode and at the same time trim the audio to match the clip durations in the video track. Is there a way?
There is no way to do that directly. You will have to go into each source sequence that Premiere creates and trim the audio there. If you use the shortcuts for Open in Timeline, Add Edit, Select Clip Under Playhead and Ripple Delete it doesn’t have to take forever.
It seems to me PluralEyes 4 is much more accurate and faster while syncing clips from cameras from different angles.
I used to use Premiere CC’s built in Synchronization feature until I discovered PluralEyes 4.
My setup was to record from 5 cameras during a 1 hour event.
Camera Right
Camera Left
Camera Center
Camera Center on the Crane
Camera Moving
Then after import, while each camera was copied into ints own folder, I drag the folders to PluralEyes 4. I also drag the Final audio I have got from the audio man, and click synchronize. Few seconds and it synchronizes everything very smartly.
Then it gives me an xml file to be imported into Premiere CC. It contains all my source clips exactly in the same folder hierarchy I have made, plus a multi-cap sequence that is ready to be nested in another sequence and multi-cam enabled and be cutted using keyboard shortcuts (1,2,3,4,5).
I also do not flatten my multi-cam, even after color grading and transitions adding. That is because often times I need to come back to that sequence and create different versions of that video (let’s say a 1 minute square version for Instagram).
Yes, PluralEyes is a bit faster. I don’t know about the difference in accuracy – since I’ve never had the built-in syncing fail. But why don’t you use the PluralEyes Premiere Pro Panel instead of going the cumbersome XML route? You will need to Flatten your multicam if you want third-party software like Resolve or ProTools to understand the sequence.
Nice
How does this workflow work with proxies? My system is bogging down from a job comprised of many RED files that are interviews with dual system audio, so I want to make proxies of them. Then, I need to be able to use markers to have a running ‘transcription’ of the interviewee. Is this possible in your workflow? Where would the markers be set? On the timeline of the multi-camera ‘cutting sequence’, or in the source video (lacking the production audio)? Since you’re not merging the clips, it looks like you’re editing from sequences, pancake-style, but I find that cumbersome at times.
I haven’t tried this with proxies, but I guess it would not work properly. Just try with a few clips and see how it works – and let us know.
I would put the markers in the source sequence. You don’t have to use the pancake editing if you don’t like it. Just use the synced sequences as your sources without opening them in a timeline.
This is an awesomely quick method of syncing, so thanks for that. But every time I try to export, I keep getting the “Error Compiling Movie, Source: Bad Exporter” message. Any idea what might be causing that. Is there a step I’m missing? I thought it might be a render issue, but even after rendering the sequence I still get the error.
I don’t see how syncing can cause an export error. Especially after flattening, since you only have the original source files left in the sequence. Premiere should also give you an indication of around what frame the problem occurs, and you must check the file that’s used there, since it may be corrupted. Most likely a jpeg or an mp3, but could also be any video file.
Thanks for this tutorial. After creating multicam sequences using files from a single camera/dual system sound shoot, I load the resultant sequences into the timeline and indeed it shows audio track names from my audio recorder and the correct files are linked. BUT when I unlink the audio from the video in the timeline, the audio track names immediately change to reflect the name of the video clip. Can this behaviour be changed? I’d like to unlink the audio from the video but preserve accurate track names. Thanks in advance.
Richard, I’ve not seen this behavior before, but I can reproduce it. Looks like a bug! I filed a bug report.
In the meantime, may I ask why you’re un-linking the video and audio? If it’s just som you can move the audio and video separately, you can do this by Alt-clicking the audio or video part of the clip first, and then move it. No need to un-link.
Hi there. I have A video clip and an audio clip with similar timecodes on the timeline, but when I select and right click to Synchronise then the Synchronise button is greyed out and unclickable? Any help please.
I’ve only experienced this when the clips are not on different tracks. If they’re on the same track, Premiere would have to destroy one of them to get them in sync.
Hi Jarle,
I’m having difficulty getting my multicam source sequence working properly with two different dual system synced audio sources. Here’s my setup:
Reference clip:
Video with stereo audio
Dual system audio clips:
1) ambisonic mic (4-channel adaptive)
2) lav mic (mono)
Creating a multi-camera source sequence seems to work properly. When I open the multicamera clip in a timeline, I see the two dual system tracks properly synced to the video clip with its audio muted.
I can bring the multicamera clip into a cut timeline and QW edit as you show. It really is a fantastic way to work!
The problem is when I try to flatten the multicamera clips. I don’t get all of my audio tracks back. I only seem to get whatever was on track one. Flattening doesn’t bring back track two, even though it’s definitely there when I open the multi-cam clip in it’s own timeline.
I’ve tried all kinds of different settings in the Create Multi-Camera Source Sequence menu and nothing is working. How do I get all my audio tracks back when I flatten? Thanks!
Hi David, sounds like your Multicamera Source Sequence has too few output channels. Make sure it has as many output channels as you have tracks. This probably means it needs to be a Multi-Channel sequence. You could also try the “All Cameras” setting when you’re making the Multicamera Source Sequence.
Hi Jarle,
Thanks for the fast reply.
In the dialogue box under Sequence Preset: I’m specifying VR 6Kx6K with ambisonics.
In the Audio section of the dialogue, I’ve tried ambisonics and adaptive, as well as Camera 1 and All Cameras. No luck with any combination.
I’ve confirmed the multicamera source sequence has the correct number of outputs, and have tried both dragging to create a new cutting sequence and dragging into an existing cutting sequence. In both cases, the cutting sequence also has the correct number of outputs.
Everything works properly if I sync only one of my dual system audio sources, but when I sync them both, only the 4-channel track comes back when I flatten. I’m obviously missing something here, but having tried every combination I can think of, I’m stumped.
Have you tried syncing from this kind of dual system setup? Could this be a bug? Thanks!
Hmmm… Could you send me a link (via FileMail, YouSendIt, Google Drive, DropBox or something) to some sample footage, so I can try syncing it? leirpoll(at)online.no.
Will do. Thank you!
Check your email for a notice from WeTransfer.com. Thanks!
Hi. I am considering a double system setup for my first ever video shoot. Just looking up videos online to get an idea of what post editing work would be like. This tutorial is great.
I do wonder however if the camera track and the sound recorder track being different lengths would pose a problem in syncing (I would be starting and stopping the camera and the sounder recorder manually). There is also the worry of audio drift in very long takes (ones that last for two or three hours), that is when the sample rates are being matched.
Thanks.
Hi Glenn, I cover this in the video tutorial. There’s one scene where the audio was running through three camera takes. As you can see, the syncing still works. Drifting can be a problem on long takes, and you should probably sync long takes manually, as analyzing the waveforms will take a long time. Manual syncing will probably be quicker.