
Limitations in the Lumetri Color Panel

This video tutorial is about some limitations and illogical behaviors in the Lumetri Color Panel that you need to be aware of to use it correctly and get the best image quality. I think the Lumetri Color Panel is a great idea, but it still has two areas where it does a really, really bad job: Overbrights and Secondaries. UPDATE, April 2017: Adobe have fixed this in the 2017.1 release of Premiere Pro!

The Lumetri Color Panel handles overbrights wrongly
Vanishing overbrights
UPDATE: This was fixed in the 2017.1 release!
Surprisingly, when you drag down the Whites slider, the overbrights stay above 100%! This is really bad for formats that actually store overbrights. Furthermore, this is not how other software, like Adobe Camera RAW and others, work. So most people destroy their images with the Lumetri Color Panel without knowing it!
Because it’s the default setting, people clamp the scopes signal at 100 % and show 8-bit color resolution. So they never see their overbrights and think there is no more detail to be found in the clouds and other overbrights, and that their footage cannot be saved.
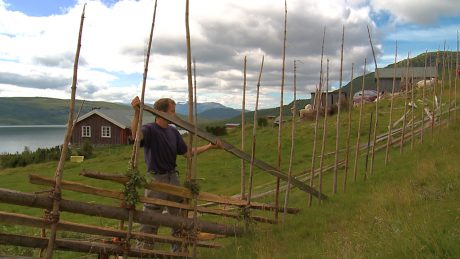
Footage corrected with Lumetri Color Panel. Note the blown-out clouds.
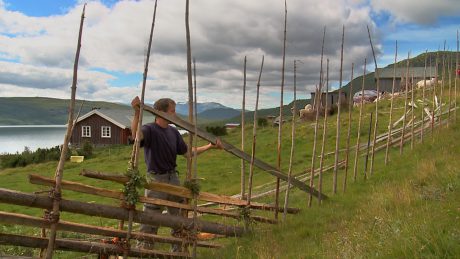
Footage corrected with RGB Curves and Three-Way Color Correction. Note the increased detail in the clouds.
Strange Secondaries
Then there’s the Secondary Color Correction, which looks at pixels after all other adjustments, instead of looking at the original pixels in the footage. That makes further tweaking very cumbersome.
These two limitations are the reason that I still don’t use the Lumetri Color Panel, even though I’d love to. I get much better results, faster, with the so-called “obsolete” RGB Curves and Three-Way Color Corrector effects.
Let’s hope the Premiere Pro team can fix these problems before the next release, and make the Lumetri Color Panel work as good as the old effects – or better.
Video tutorial


Star Man.
Hey thanks for that. Was wondering if you have updated the Lumetri ColorPanel section in your book. I bought the book a couple of months ago. and its great, but there is nothing on that section that I see. Thanks Jon
The book was written for the CC 2014.2 version, and there was no Lumetri Color Panel at the time. I am in the process of updating the book. See https://premierepro.net/coolstuff/#faq for details. Because of the limitations shown in this tutorial, I don’t recommend using the Lumetri Color Panel (yet) anyway. If they do get it to work properly, I’ll start using it.
if you use the curves and color wheels first to make the basic grade you will not get this behaviour.
Sorry June, but that’s not true. Try this: Use the Curves and wheels to do your basic grade – then drag your Whites slider. Now what used to be overbrights will stay close to between 90 and 100, while the rest of the signal is going down. You end up with a gap around 90% instead of at 100. Not exactly great.
Other issues – I’ve discovered that when working with HDR material, Lumetri renders differently between After Effects and Premiere. Premiere doesn’t color manage, After Effects can. After careful tests to verify that rendering EXR sequences unchanged through After Effects didn’t alter their color as compared to the original EXR sequences. But using the same settings in After Effects as I did in Premiere, the rendered output, when compared to the Premiere version, had crushed blacks and darker shadows, but left the highlights the same. Sort of a reverse Gain setting.
Do you use same bit depth in AE that in Pr? By default it set to 8bit in Ae
Thanks, Jarle. This’ll save my C-Log 2 footage. I was unhappy with the color and couldn’t figure out why. Also, I enjoyed your courses at Adobe MAX this year. Thanks for coming and teaching.
Good job, Jarle.
Thanks Kevin!
Thanks for this breakdown!
I also find the gain slider to be insufficient in the 3-way colour tab within Lumetri, I find myself boosting it and sliders in the basic correction tab.
Also of note – simply loading a LUT in Lumetri as of CC 2015.3 is a complete resource hog vs CC 2014.
Hey!
Can we get this video you used, in raw to experiment? It will be nice, maybe i can found a solution
It’s not RAW, it’s XDCAM footage. Unfortunately, I can’t share the footage – but there’s a lot of XDCAM EX material out there that you can download for free. Here’s a link to one clip that has overbrights
This is interesting. I’ve never had this problem. I shoot in avchd. Have you tried turning clamp off?
Didn’t you watch the video? Yes, I’ve turned clamping off, otherwise I wouldn’t know there were overbrights. But you know that clamping is a setting only for the scope, right? It doesn’t affect the image at all.
Tnx for the info Jarle.
Now I have to see what to do with all my LUTS if I stop using Lumetri?
Did some tests could get the same results with RGB curves and three way color corrector 🙂
Probably will save them as presets?
Hi Jarle,
With the deficiencies in Lumetri regarding the highlights, what is the best workflow if working with LUTs ?
Can we use a LUT on an adjustment layer and then use the 30way and RGB ?
BTW, i’ve always used your tweaked 3-way col corrector……….thanks 🙂 .
Hi Ronan, since the newest version of Premiere (2017.1.2) doesn’t have this problem, you can safely use Lumetri for color correction from now on. Depending on what kind of LUT you’re using, there are several different workflow. If your LUT is a correction LUT – like LOG to Rec709, then use it as an Input LUT in Lumetri. If it’s a Look, add it on an Adjustment Layer. You should not use correction LUTs on Adjustment Layers, because the sliders and controls are expecting Rec709, and will not work correctly with LOG input. The 2017 version of The Cool Stuff in Premiere Pro covers the Lumetri Color Panel, Scopes and workflows in great detail. https://premierepro.net/coolstuff/
Hey Jarle,
Thanks for all your insight and commitment to helping editors around the world.
I’ve been using 3-way colour to correct LOG footage because the LUTs I’ve downloaded simply do not look good. We shoot a lot of Sony FS7. Even the Sony website’s own LOG files seem off. Any suggestions on a good LOG to Rec709 source?
Remember, a LUT is just a locked color correction preset. I would shoot a test image with some known colors, including skin color and foliage, and correct that with the Lumetri Color panel – then save it as a LUT. This way, you get a custom LUT that looks the way you want. Or better: save as a Lumetri Color preset. Presets can be tweaked further, LUTs can not, except from intensity. I would be happy to share your LUT on premierepro.net.