Multicam Tips & Tricks for Premiere Pro Editors
I wrote the Multicam chapter in the Best Practices and Workflow Guide for Adobe, and this post is a collection of both simple and more advanced techniques and workflows that didn’t fit in the Best Practices Guide format, but nevertheless can be really useful for Multicam editing workflows. The techniques here are not necessarily the ones recommended by Adobe, but they have proven to be helpful to some Multicam editors. The order is somewhat random.
Links to the sections
- Creating the Editing Sequence
- Creating Multicams Manually
- Creating a Multichannel “Direct Out” Sequence Preset
- Syncing Clips in a Timeline
- Gotchas when Syncing via Audio Waveforms
- Converting your Custom Sequence into a Multicam
- Enabling Multicam for Video Only
- Trimming Multicams with keyboard shortcuts
- Syncing Clips that do not Sync Automatically
- Adding more Camera Angles
- Cutting with empty Camera Tracks
- Choosing a Sequence Preset other than Automatic
- Ganging Monitors when viewing Multicams in Source Monitor
- Playback Problems when Multicam is open in Source Monitor
- Pixelated Image from Source Monitor via Transmit
- Multicams with mixed size sources
- Safe Margins and Multicam
- Use a Duplicate Clip to Punch In
- Multicam with visual aid
- Renaming Multicams
Multicam Deep Dive
I did a Deep Dive on Multicam editing at the January 2024 Meeting for the San Diego Premiere Pro User Group. You can watch the recording here. It’s a bit messy, since I was driven by questions from the attendees, but there’s a lot of info in there.
Creating the Editing Sequence
Many users get audio problems (all tracks panned left) because they’re creating a new sequence from the Multicam. Don’t.
Create a new sequence manually, then drag your Multicam into that sequence.
Edit: Multicams are nested by default since version 24.1. This means we can now safely create a new sequence from a Multicam clip, and get standard audio tracks. YAY!
To change that behavior, choose Multi-Camera Follows Nest Setting in the Timeline panel menu. Now the Insert and Overwrite Sequences as Nests or Individual Clips button (I call it the Nest-or-Not button) controls the behavior.
Creating Multicams Manually
It’s possible to create Multicams manually, bypassing the Create Multi-Camera Source Sequence dialog. If you plan to do so, be especially careful when choosing the Audio settings under the Tracks pane when you create your sequence. Don’t choose Stereo Master, even if you need only two audio channels—instead choose Multichannel and then choose two channels.
A sequence with a 2-channel multichannel master will act as stereo, but can easily be changed to more channels later. You cannot change a sequence with Stereo Master to Multichannel Master later, so choosing Multichannel gives you more flexibility.
More often than not, you’ll need more than two channels in your master track, as you need one track per source channel to make sure audio waveforms come through.
Creating a Multichannel “Direct Out” Sequence Preset
Most workflows require a sequence with Multichannel audio, where all tracks are Mono tracks, and the panning is done right. Start by clicking File > New > Sequence, or hit Ctrl/Cmd+N, to get the New Sequence dialog. In the Settings tab, choose Custom for Editing Mode, and set Timebase to the desired frame rate.
Also set Frame Size, Pixel Aspect Ratio, Fields, Display Format, Working Color Space and Audio Sample Rate to match your needs. Change the Preview File Format and other settings under Video Previews if needed.
Now click the Tracks tab, and set the Audio Master to Multichannel with as many outputs as you need. You can choose to have either Standard tracks or Mono tracks, depending on how your source media is set to import. When in doubt, use Mono. Click the + button multiple times to create up to 32 audio tracks.
Tip: It’s OK to set more channels than you typically use— it can easily be changed before you drop the Multicam into your edit timeline.
Tip: Paul Murphy explains a fast way to create a custom Multicam sequence in this video tutorial: https://www.youtube.com/watch?v=aiVYRuWohZI
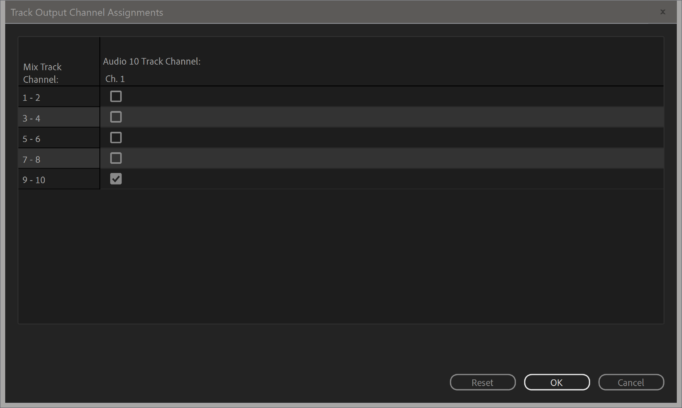
Now it’s time to do some Output Assignment to make sure the routing of all the tracks is set correctly. Click the Output Assignments button for the Audio 1 track to bring up the Track Output Channel Assignment dialog.
Make sure there’s a single check box set for Master Track Channel 1-2 and click OK.
Now set the Pan slider for Audio 1 all the way to the Left, showing -100.
We’ll repeat this procedure for the rest of the tracks, making sure every track goes to a different master track channel.
Tip: If you already have a sequence with the correct audio settings you can use the Load from Sequence button to import the settings from that sequence.
Click the Output Assignments button for the Audio 2 track, make sure it’s set for Master Track Channel 1-2, and click OK. Now set the Pan slider for Audio 2 all the way to the Right, showing +100.
Click the Output Assignments button for the Audio 3 track, make sure it’s set for Master Track Channel 3+4, and click OK. Slide the Pan slider all the way to the Left.
Click the Output Assignments button for the Audio 4 track, make sure it’s set for Master Track Channel 3+4, and click OK. Slide the Pan slider all the way to the Right.
Repeat the above steps until each audio track has been assigned a corresponding channel and has been panned correctly. For example, track 32 should be assigned to 31-32 and panned right.
Click Save Preset and give it a recognizable name, like 1920×1080, 23.976 DIRECT OUT. Add any descriptive notes you think will help you remember what the settings are in four months. The preset will be available in the Custom folder in the New Sequence dialog.
Tip: Paul Murphy also has a good tutorial on Multi Cam Audio Issues & How to Avoid Them: https://www.youtube.com/watch?v=M89zzmK_qcc
Syncing Clips in a Timeline
Use Shift+G on the source clips in a bin to make them mono and choose what tracks you want to use from them before you add your clips to the sequence. Create a new sequence using the Direct Out preset you just made. Double-check the routing in the Audio Track Mixer.
When syncing clips in the timeline, you can only sync one clip on each track at a time. Premiere Pro will not allow you to syncronize multiple clips on one track, to avoid collisions. You can still have multiple clips on each track, but you can only select and sync one of them at a time. Right-click > Syncronize.
To avoid any conflicts you can move all the clips to separate tracks, sync all clips in one go, and then move the clips to their correct tracks.
With all clips on separate tracks, select all the clips and click Clip > Syncronize or right click one and choose Syncronize—or use a custom keyboard shortcut. Choose the syncing method and hit OK.
When syncing by timecode, Premiere Pro will move all the clips except the one that starts with the lowest timecode value. If multiple clips share the same lowest start timecode, Premiere Pro will move all clips except the one with the lowest timecode value that’s on the lowest track.
The same rules apply when syncing with audio waveforms; no clips are moved to the left, so make sure the clip that you want to move into sync is placed to the left. You can trim the start of the clip temporarily if that’s necessary to achieve this.
Gotchas when Syncing via Audio Waveforms
Like syncing with Timecode, syncing via Audio can be done in a batch. If the content is scripted, with multiple takes having the same dialogue, Audio syncing may not work properly. The matching will be done by comparing waveforms, and if some takes have very similar waveforms, it may fail. In these cases, you may need sync each take separately.
Converting your Custom Sequence into a Multicam
When you want both video and audio to be Multi-camera enabled, you’ll want to use your Direct Out preset when you create the Multicam, and nest the sequence manually. Tidy up the sequence first by moving all clips from each camera to the same track, and delete all empty tracks.
Drag the sequence you want to convert to a Multicam into the Source Monitor, right click in the Source Monitor and choose Multi-Camera > Enable.
Tip: If you want to switch audio with video, also choose Multi-Camera > Switch Camera Audio. Remember to also enable Multi-Camera Audio Follows Video in the edit sequence.
The next step is crucial: select the Multicam in a bin and hit Shift+G, choose Mono in the Modify Clip > Audio dialog, and decide how many audio channels you want and what tracks to include.
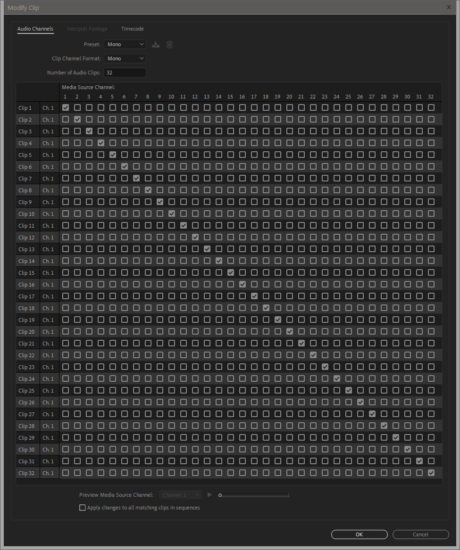
Modify Clip > Audio. Note that every audio channel goes to a separate output. The maximum number of outputs is 32.
Now put the Multicam sequence into your edit sequence. If you’ve done everything right, you should see all the audio tracks you decided to include—and they should have waveforms.
Make sure the Insert and Overwrite Sequences as Nests or Individual Clips button is blue in your edit sequence.
Enabling Multicam for Video Only
When you want to keep all the original audio clips, and just cut the video in Multi-Camera View, you can use this method. Tidy up the sequence by moving all clips from each camera to the same track, and delete all empty tracks.
Hold down Alt/Option while selecting only the video part of the clips, then right-click and choose Nest. Give the nested sequence a descriptive name, right-click it and choose Multi-Camera > Enable. The result is that you can cut the video using the Multi-Camera View, and still have access to all the original audio clips. You can disable audio clips you don’t want to hear.
Tip: Don’t just Enable Multi-Camera when the sources have more than two audio channels and you want to switch Audio. The tracks need to be Adaptive for Switch Audio to work.
Tip: Do not enable multiple audio tracks for Multi-Camera. Audio will be affected, and your waveforms will disappear.
Another way to work with Multicam video and original audio clips is to use the Create Multi-Camera Source Sequence dialog to create the Multicam, and then put only the video part in the edit sequence, and copy all the original audio clips from the Multicam to the edit sequence.
Trimming Multicams with keyboard shortcuts
You can use the Rolling Edit tool, the Ripple Edit tool, and other tools to fine-tune and trim your Multicams after the initial cutting. But you’ll work much faster if you learn these useful keyboard shortcuts:
| Keyboard shortcut | What it does |
|---|---|
| Q | Trims the start of the clip to the Playhead position (faster than the Ripple Edit tool) |
| W | Trims the end of the clip to the Playhead position (faster than the Ripple Edit tool) |
| Shift+Q | Moves the previous cut point to the Playhead (faster than the Rolling Edit tool) |
| Shift+W | Moves the next cut point to the Playhead (faster than the Rolling Edit tool) |
| Ctrl/Cmd+K | Splits the clip in two (faster than the Razor tool) (I change this to R) |
| E | Moves the selected cut point to the Playhead (faster than the Rolling Edit tool, but one click more than Shift+Q/W) |
Syncing Clips that do not Sync Automatically
If a clip cannot be synced with others by the syncing method you’ve chosen, you will get a warning message.
When automatic syncing doesn’t work, you can sync manually by sound or image. Find a frame in the timeline where something significant and easily recognizable happens in either the audio or the video, and park the playhead there. Find the same spot in the new clip in the Source Monitor and add a marker by hitting M. Put the clip in the timeline approximately where it should be, then make sure that Snapping is on and drag it sideways until it snaps to the playhead.
Tip: If you have a clapper, that’s an obvious choice, but any significant event will do – l like when a door closes or an actor does a gesture.
It’s a good idea to check that the clip is properly in sync. You can do this by audio or video, depending on the clips.
If there is audio both on the clip that will not sync, and on at least one other clip, you can place the clip in the timeline approximately where it should be, then solo the two tracks and listen to distinct sounds that can be heard in both clips.
Then nudge the new clip into place by holding Alt on Windows, Command on macOS while tapping the Left or Right Arrow keys. Add Shift to move in larger steps. When the clips are not perfectly aligned, you will hear what sounds like an echo. Ideally there should be no echo at all when you play back with both clips soloed.
Tip: When moving audio clips, choose Show Audio Time Units in the timeline panel menu to nudge the clip one sample at a time.
To check the sync by video, place the new clip approximately where it belongs, in a track above the others, and reduce its Opacity. When you scrub the timeline or use the Left and Right Arrow keys to move back and forth, you will easily see if they’re in sync, and you can nudge the clip to move it into sync. Remember to reset the Opacity when you’re done.
Adding more Camera Angles
You can add more angles to a Multicam at any time—even after it’s been cut. Add new clips on new tracks in the Multicam, and new angles will show up in the Multi-Camera View.
When adding clips with audio, add more channels to the multichannel output of the Multicam if you want audio waveforms to come through.
Cutting with empty Camera Tracks
Some workflows require that you leave some tracks empty for more camera angles to be added later. This will result in “empty” camera angles showing up as black in the Multicamera Monitor. In these cases, use the Edit Cameras feature found in the Program Monitor Settings menu to temporarily change the order of the camera angles in the Multicamera Monitor. When more angles are added, re-order the angles in the same manner. Note that this works on a per clip basis, and since there is no “reset” feature, it’s recommended that you duplicate your sequence before editing cameras.
You can also use the Pages feature in the Multicamera Monitor to decide how many cameras you want to see.
Choosing a Sequence Preset other than Automatic
When you select Automatic in the Create Multi-Camera Source Sequence dialog, the video preset is based on the video format of the first video clip you selected before you chose Create Multicamera Source Sequence.
In general, you want the sequence preset to match the video clips you’re working with. If your source clips have different frame sizes, you may want to select a sequence preset that matches what you want to use. For example, if you are syncing two clips in UHD resolution and one clip in HD resolution, and you plan to edit and deliver at UHD, you may want to use a UHD sequence for the multicam instead of choosing Automatic.
Tip: Video settings in a sequence can be changed at any time, so you don’t have to re-sync your clips if you chose the wrong preset. Just open the Multicam and choose Sequence > Sequence Settings and do the necessary changes.
Ganging Monitors when viewing Multicams in Source Monitor
In the Settings menu in the Source Monitor and the Program Monitor, you have the possibility to Gang Source and Program. When this is enabled, scrubbing in one monitor makes the other one follow. The Source Monitor does not update when you’re playing the timeline, but it will update when you pause playback.
If you do a Match Frame before ganging, the monitors will always be in sync when scrubbing, and when playback is paused. Ganging is disabled when the Program Monitor is in Multi-Camera View.
Tip: Ganging is lost if you turn Transmit on or off, so you will have to re-enable the ganging.
Playback Problems when Multicam is open in Source Monitor
If your Multicam is open in the Source Monitor while you’re cutting with the Multi-Camera Monitor, playback performance will suffer, causing dropped frames and stuttering. Close the Multicam clip from the Source Monitor or hide the Source Monitor panel to avoid this.
Pixelated Image via Transmit
If you have checked Transmit Multi-Camera View in the Program Monitor panel it also affects the Source Monitor. Opening a Multicam sequence in the Source Monitor will transmit the active camera in the Multicam view. The image via Transmit will be pixelated because it’s a scaled-up low-res image. Un-tick Transmit Multi-Camera View in the Program Monitor settings menu to avoid this.
Multicams with mixed size sources
A common workflow is to have both 108p and 4k sources in the same Multicam. When your sources have different sizes, you’ll have to make some choices. If most sources are 1080p, you’d probably want to create a 1080p Multicam. You can easily do this by selecting a 1080p clip first when you select sources before creating your Multicam. If you select one of the 4k clips first, you’ll get a 4k Multicam.
If you don’t do anything to your 4k clips in a 1080p Multicam, the Multi-camera View will show a center crop of those clips. But if you use Set to Frame Size on all the 4k clips inside the Multicam, they will show correctly in the Multi-camera View. When you’ve edited the sequence, you can flatten the Multicam, and get access to all the pixels in the 4k clips for repositioning etc.
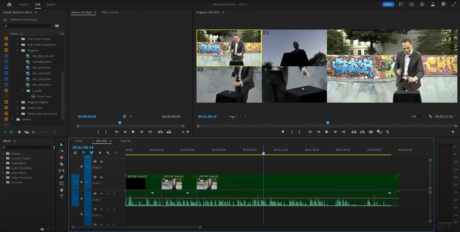
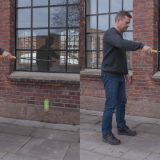
Here’s a few images to show the problems you can get. The Interview clip is 4k, the other ones are 1080p.

4k source, 4k Multicam, 1080p Edit Sequence. Set to Frame Size used on the multicam clip. Source is center cropped, output is not.

4k source, 1080p Multicam, 1080p Edit Sequence. Set to Frame Size used on 4k clip inside the Multicam. All good.
Safe Margins and Multicam
Safe margins and guides are disabled when you’re in Multi-camera View. If you need to see safe margins when you’re cutting Multicam, you can add a PNG on a track above the Multicam. You can lock the layer so it doesn’t interfere with the editing. You will only see the safe margins in the output, not on each source, though.
You can download a 1080p PNG with the standard safe margins settings here.
Use a Duplicate Clip to Punch In
You can duplicate a layer in the Multicam and scale it differently to get “two cameras”. If the clips are 4k, and you’re editing in an HD sequence, use one as a “wide shot” and one as a “close up” and cut between them.
Multicam with visual aid
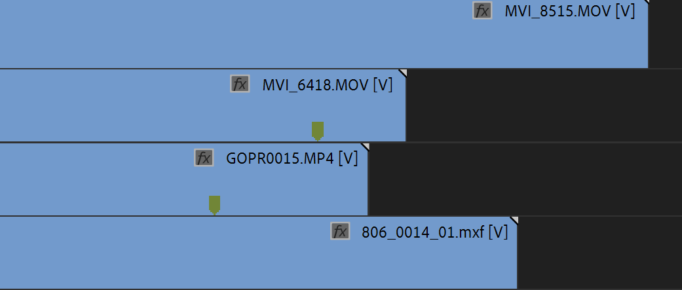
When a camera is stopped periodically during a Multicam shoot, there’s no way in the timeline to see WHEN it’s stopped. You may accidentally cut to that camera just before it’s stopped, and you’ll have to go back and choose another angle. If you want a visual aid, copy clips from that camera from the Multicam and paste them above the Multicam clip in the Edit sequence, and disable them. This way, you can see in the timeline when the camera is running and not.
Renaming Multicams
When you create Multicams using Video Clip Name (or Audio Clip Name) + “something”, the Multicam gets its name from the first clip—the clip on the lowest numbered video (or audio) track. This cannot be changed in the Timeline after the fact, but if you rename the clip in the Multicamera Source Sequence, the Multicam clip in the timeline shows the new name, provided that the Show Source Clip Name and Label is turned on in the Timeline wrench menu.
To avoid this, choose to set a custom name when making Multicams.
And here’s a link to the Adobe Premiere Pro Best Practices and Workflow Guide.















Very useful. I„m thinking to use a recorder to get a primary audio line to sync all the video footage.
Black background makes this very hard to read. Is this to make it “cool looking”.
It’s a design choice. Images often look better with a dark background, which is also why Premiere Pro, Photoshop and other software have dark backgrounds. Dark mode is very common these days, and this combination of background and text passes the contrast tests for readability. https://webaim.org/resources/contrastchecker/
It reads very well on my laptop screen, on my ultrawide monitor, and on my phone – so not sure why you find it very hard to read on your device.
Excellent guide. Super useful and many thanks for helping out.
I work mainly with music videos with up to 6 cam angles synced. I’d like to be able to practice working through a song without actually making cuts to the multicam. At the moment, I’m undoing and rewinding every time. Is there a practise mode?
There’s no practice mode, but you can drag the multicam to the edit timeline as many times as you need, starting fresh.
hello Jarle, amazing post and the guide is extremely helpful. is it ok to nest footage in the multi cam sequence? The use case would be using adjustment layers to grade all of the clips of a specific camera at once.
so for example (cam a, cam b, audio). create mutlicam using timecode, select track 1 , nest. select track 2, nest. color correct in the nested sequences, create the main edit sequence from the multi-cam and then edit from there.
Hi Ahmed, as long as your system can handle it and you get smooth playback, that’s a valid way to work.
This is so thorough, thank you Jarle! Going to reference this for some upcoming projects.