Scale to Frame Size vs Set to Frame Size in Premiere Pro
The Scale to Frame Size and the Set to Frame Size features in Premiere Pro sound like they do the same thing, but they don’t. Plus, their names are not all that logical, so people tend to misinterpret what they do. I wrote an article for the Film Editing Pro blog named “The Editor’s Guide To Working With Still Images In Premiere Pro” where this was just one of many topics. You can read the whole article on their web pages. Here’s an excerpt from the article, about Sale/Set to Frame Size.
Edit: Update for version 25 of Premiere Pro
Fit to Frame Size is now gone from Premiere Pro, and instead we’ve got the new and better Fit to Frame and Fill Frame commands in the right-click menu, and in the Properties panel. Both can be used on multiple clips at a time.
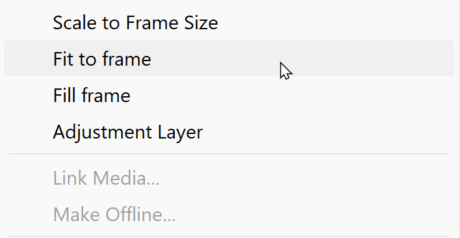
Fit to Frame an Fill Frame in the right-click menu in the timeline
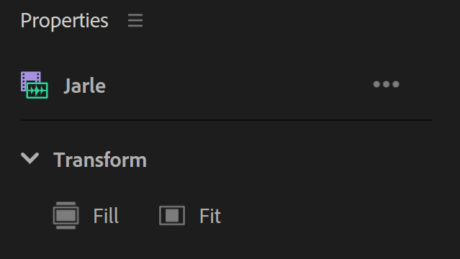
Fit to Frame an Fill Frame in the Properties panel
Scale to Frame Size vs Set to Frame Size in Premiere Pro
If you want images and video to always scale to fit inside the size of the sequence, you can use one of two methods: Scale to Frame Size or Fit to Frame Size. They can both be found in the right-click menu for clips in the timeline, and in the Clip menu, under Video Options.
So, what’s the difference?
Scale to Frame Size
The Scale to Frame Size option will resample your image at the size of the sequence. So, if you use this on an image that’s double the width of the sequence, you end up with an image that’s ¼ of the original pixel size, while the Scale will be set to 100%. This is a great way to reduce the strain on the system, but it will degrade the image if you scale it further.
Set to Frame Size
The Set to Frame Size option, on the other hand, will not resample the image, but instead set Scale in the Effect Controls panel to whatever it needs to be to fit the image inside the frame. In my case, since the image is 3840 px wide, that’s 50% for a 16/9 image. All the pixels are still intact, which is great when you want to scale the image further in the Effect Controls panel, but you’ll need more computer power.
How to use them
Scale to Frame Size is also available in the bin. Select the clips you want to automatically scale to frame size, and click Clip > Video Options > Scale to Frame Size. When you put the clips on the timeline, they will auto-scale.
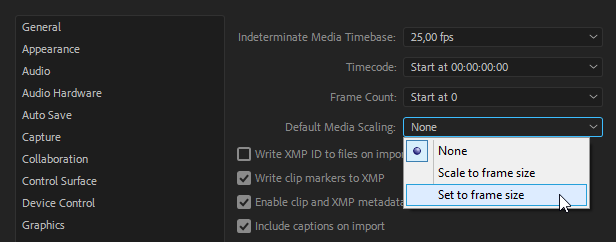
If you use this feature all the time, you should set this in your preferences. Click Preferences > Media > Default Media Scaling, and set it to Set to Frame Size. Or use Scale to Frame Size to reduce the strain on the computer, and remember to change it to Set to Frame Size for the clips you want to scale further, before you start scaling them.
In reality, the Scale/Set to Frame Size options are not as useful as you’d think. Most images from a DSLR will not be 16/9 aspect ratio, so the scaling will result in letterbox or pillar box looks with black bars.
A much better approach is to create a Motion preset that scales the images to the desired size, so you don’t get any black bars.
Make Scaling Presets
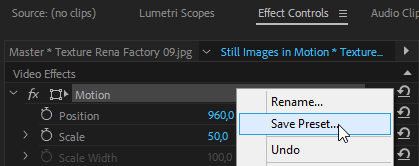
To make a preset like this, set scale to whatever it needs to be to fill the whole frame. In my case, it was 50%. Then right-click on the word Motion in the Effect Controls panel and choose Save Preset. Name it 50% Scale or something similar. Next time you need to scale 70 images, just select them all in the timeline, and throw this preset on one of them. Perfect scaling in less than a second!
To learn a lot more about working with Still images in Premiere Pro, read my article “The Editor’s Guide To Working With Still Images In Premiere Pro” on the Film Editing Pro blog.












Great explanation and overview, thanks!
“Default Set-to-framesize” has an annoying bug, where if it is turned on you can’t use cut-paste to move things around the timeline, because it will strip out any motion that was previously applied. In my view, the default should only apply to when you add new stills to the timeline.
Yes, this is annoying. But it only affects Copy/Paste, not Alt-drag to make copies. So until Adobe fixes this, use Alt-drag instead of Copy/Paste.
I want to learn from the basic. I shoot videos but I don’t edit I always pay for editing. Please could you teach me from the start up to advanced level.
On every page of PremierePro.net you will find a sidebar with links to “Premiere Pro Classroom in a Book”, which is a beginners book, and to “The Cool Stuff in Premiere Pro” which is an advanced book. After reading both of these, you will have mastered the art of editing in Premiere Pro.
Thank you very much for sharing your information.
Nice work, Greetings here from Brazil.
Does this have any work around in CS6 PP
You can use my presets pack, and drag a Scaling preset to the clips instead of using the Scale to Frame Size option.
https://premierepro.net/jarles-premiere-pro-presets-version-4/
Great explanation and overview!
Thank you very very much for sharing! thanks!
If I scale/Set to frame size on a 4k or 2k clip to a1080p sequence, will it affect/reduce the quality of the clip? I want to know if the quality will remain when exported as 1080p?
Will it reduce the quality? Yes, of course—you’re throwing away 3/4 of the pixels of the 4k image when you scale it down to 1920 x 1080. If you’re asking of the 4k image will have the same quality as 1920 x 1080 material when you scale it down, the answer is yes. If you just scale it down to fit the frame, there’s no difference between Scale to Frame Size and Set to Frame Size. But if you scale it again, after scaling it to fit the new frame size, there is a difference. If you use Scale to Frame Size and scale it up again a bit to zoom into the image, you’re losing resolution. If you use Set to Frame Size and scale it up again, you’re NOT losing resolution (until you go past 100% scale).
Most of the time i came cross people saying “Scaling to frame size, will end up on resampling the frame and lose pixels… my point if it is more detrimental than being productive, why was it included in the application /program? what is the exact point where “Scale to frame size’ comes in play please ? Thanking u in advance
When your system struggles to handle all the pixels, and you’re not planning to zoom in, Scale to Frame Size is a viable option.
How about Fit-to-screen? I mean that if I use your method, the images are still lost some parts. I just want to stretch the images to whole screen, the objects maybe look “fat” but it’s ok if the ratio close to the default (16:9 …)
Tan, Fit to screen is not an option in Premiere Pro. You will have to do that manually in the Effect Controls Panel.
Im scaling all of my images in what looks to be the frame but when i exported the video it is not at all. Can you tell me what im doing wrong? thanks
Without any details it’s not really possible to help. But then again, this is not a good forum for getting help. Try one of the Facebook groups for Premiere Pro users instead.
https://www.facebook.com/groups/2370892408/ or https://www.facebook.com/groups/premierepro/
Great hanks
I would say that the difference is relevant into Premiere workflow, but irrelevant when you export s XML to DaVinci, since Da Vinci, in any case, will relink to the original file. Therefore, yes, you will lose pixel definition with “Scale to Frame Size” if you export with Premiere, but not if you export as XML file to DaVinci. And DaVinci does not properly recognize the SET TO FRAME SIZE instruction. The correct workflow for DaVinci is “Scale toFrame Size”
Thank you commenting. Yes, you’re correct that whatever you do in Premiere Pro will not affect the video export from another software. It kind of goes without saying.
But I’m surprised to hear that DaVinci Resolve doesn’t recognize the Motion settings of a clip from Premiere. “Set to Frame Size” sets the Scale on the clip to whatever it needs to be to fit the frame—the equivalent of adjusting it manually in the Effect Controls Panel. It sounds strange that this would not be supported by Resolve.
Mixing Lights gives the exact opposite advice. They recommend using the “Set to Frame Size” option and change the Input Sizing setting in Resolve to “Center crop with no resizing”.
https://mixinglight.com/color-tutorial/master-frame-size-in-premiere-pro/
Hey, I am trying to find an answer to my question but don’t really know how to ask. whatever I have asked google, it didn’t show me any answers. So I’ll try here, hopefully you can help me.
I am taking videos with two cameras, when I drop my clips into a timeline, videos which are1920 × 1080 become 1440*1080 in Premiere Pro CC.
2560 × 1440 stay the same. Why could it be?
Would scaling the frame help?
Hi Alexandra, it sounds like your footage is 1440×1080, and that some metadata is missing. Use the Media Browser to import your clips to make sure no metadata is lost. It could also be caused by the method you use to create your sequences. This comment thread is not a good place to find out what’s going on. I recommend that you ask this question in a Premiere Pro group on Facebook. https://www.facebook.com/groups/adobepremierepro/
Here’s a question I’ve never had satisfactorily answered, and find myself confronted with it again:
I need to use 720 footage on a 1080 timeline; is it better to use Scale to Frame Size so that the pixels are resampled in the timeline before being exported to a 1080 master OR is it better to use Set to Frame Size, thereby enlarging the individual pixels in the timeline, and trust that they will be appropriately resampled during the 1080 export?
Would using Scale to Frame Size potentially result in applying this resampling to the footage twice, causing further degradation of the original image?
Or does using Set to Frame Size stretch/expand the pixels in a way that makes them look worse when later resampled at 1080 in the export?
I’ve seen a lot of posts and articles explaining the 4k to 1080 conversion as you do so clearly and concisely here, but I’ve never found a conclusive answer regarding the best practice when you have to use older, low res footage in new projects
Hi Katie, when you enlarge, it doesn’t matter which option you choose. Only when you scale down.
Unless you’re planning to do further scaling, in which case “Scale to Frame Size” would introduce another, lossy, step.
Set to Frame Size: Scales the original pixels
Scale to Frame Size: Resamples the image to a size that fits in the frame. Further scaling would use the resampled image, so you’re scaling twice.
I hope this was clear. 🙂
Yes, that’s certainly a clearer answer than I think I’ve ever found before, thank you! My nerdy need for detailed technical explanations aside, I think the practical takeaway (for the work I do) is to keep using Set to Frame Size consistently whether I’m downscaling or upscaling, because I do find myself needing to perform slight resize/reframe adjustments somewhat regularly in my projects and I don’t want to worry about any extra loss I might have created at the beginning of my workflow when those needs arise.
Thanks very much for the quick reply!
Question – I set ‘set to frame size’ as the default media scaling. This will affect everything in timelines. My project, a doc, is huge, lots of (proxy) footage, lots of different frame sizes. Would this overtime add to the size of the project file – ballooning the project file to the point it takes a very long time to save & open? Also making it difficult to email (meaning over 100-150 mb)
This setting should not affect the project file size.
Hey Jarle, Question. I’ve edited 5.6K 360 footage in a 1080p sequence.
I made a mistake with the settings scale/fit to frame size.
After the GoPro reframe I had some black bars and had to scale them up over 100 to 113
At the end of a long difficult edit I see the loss in quality.
Is there a way to reset this without having to start over?
Nik, you can just select the clips, then choose Set to Frame Size in the right-click menu, and you’ll have all your pixels back. You’ll have to do the scaling again.
If you have different scaling/positioning on each clip, I recommend that you duplicate your sequence before you do this, and temporarily nest the original above the existing clips at 50% Opacity. That way you can compare the old and the new sequence.
Perfect, thanks a lot!
Let me officially be the first person to ask a question in 2022:
When you drop a 720 video into a newly created 1080 sequence, it asks if you would like the timeline to adjust down to 720 or remain 1080 and upscale the video to fit. I assume this is basically the same operation that we’re talking about above. Am I correct?
I have a (very) old FCP7 project in DV (480) that needs to be at least 1080. I’ve already exported the FCP XML (somewhat of a nightmare) and successfully imported it into PP2022… I’m looking for the best way to get started with the knowledge that I’ll still have a lot of work to do after making other adjustments.
Hi Chris, This is kind of the opposite of the feature you’re describing. That feature will adjust the sequence settings to match the first clip you drop in (if you choose that option), while Scale/Set to Frame Size will scale the footage to fit the sequence.
A bit confusing. In the heading it says “Fit to Frame Size”, but neither function has that name.
Thank you for pointing that out. I’ve changed it now.